Creating a ToDo App with Angular, NestJS, and NgRx in a Nx Monorepo
In this post, we will be creating a fully functional ToDo application in a Nx monorepo, using Angular for Frontend and NestJs for Backend. The ToDo app will also provide Angular’s state management using NgRx. Our frontend app will be using Tailwind to style our components.
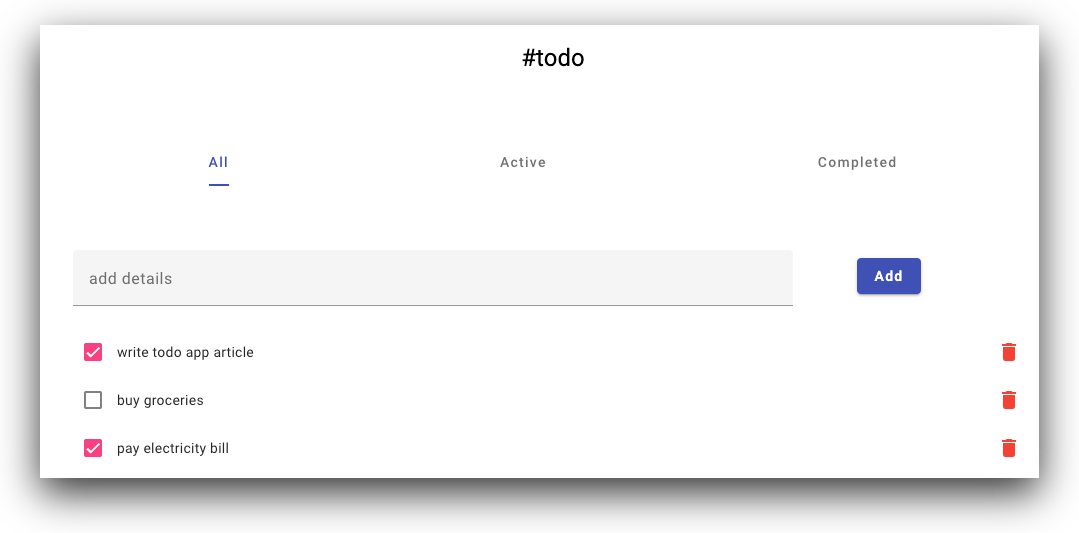
Let’s proceed to setting up our project.
Step 1: Set Up Nx MonoRepo with Angular and NestJS
-
Create a new Nx workspace using latest Nx version
npx create-nx-workspace@latestand follow the on-screen instructions by choosing Angular project. Your end result should look something like this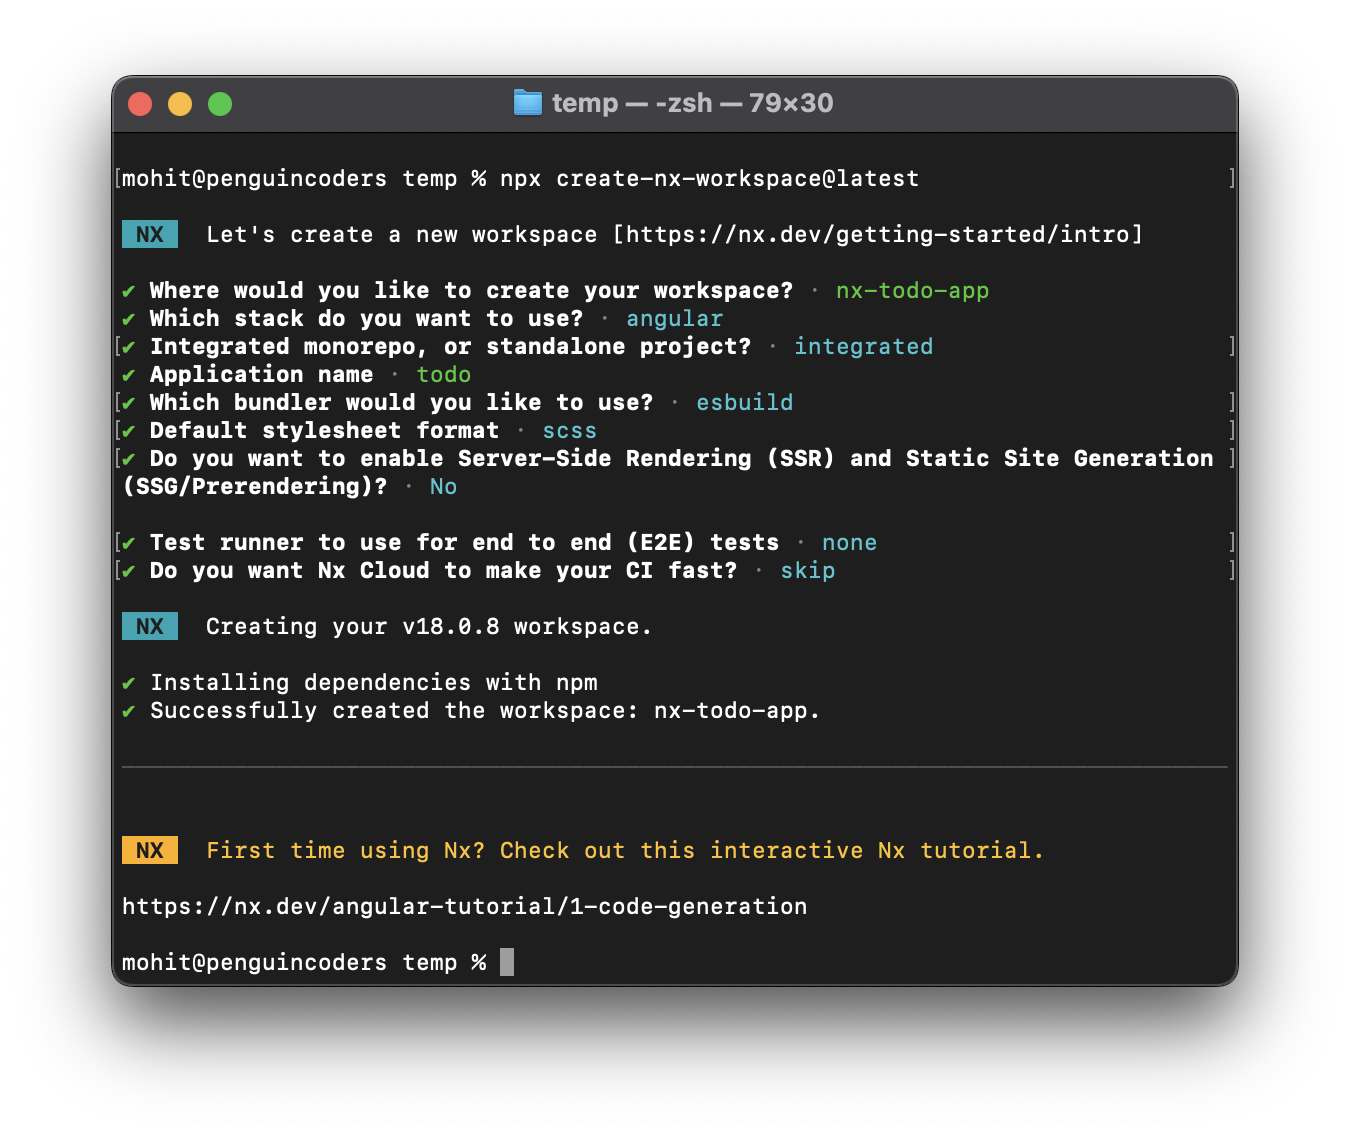
-
Now, add NestJs to your monorepo in your monorepo’s directory using
nx add @nx/nest -
Create a new NestJs app which will keep our backend APIs in the monorepo using
nx g @nx/nest:app apps/api --frontendProject todowhich will generate 2 folders api and api-e2e. Our APIs will be present in the apps/api folder. It will also add aproxy.conf.jsonin the apps/todo folder. -
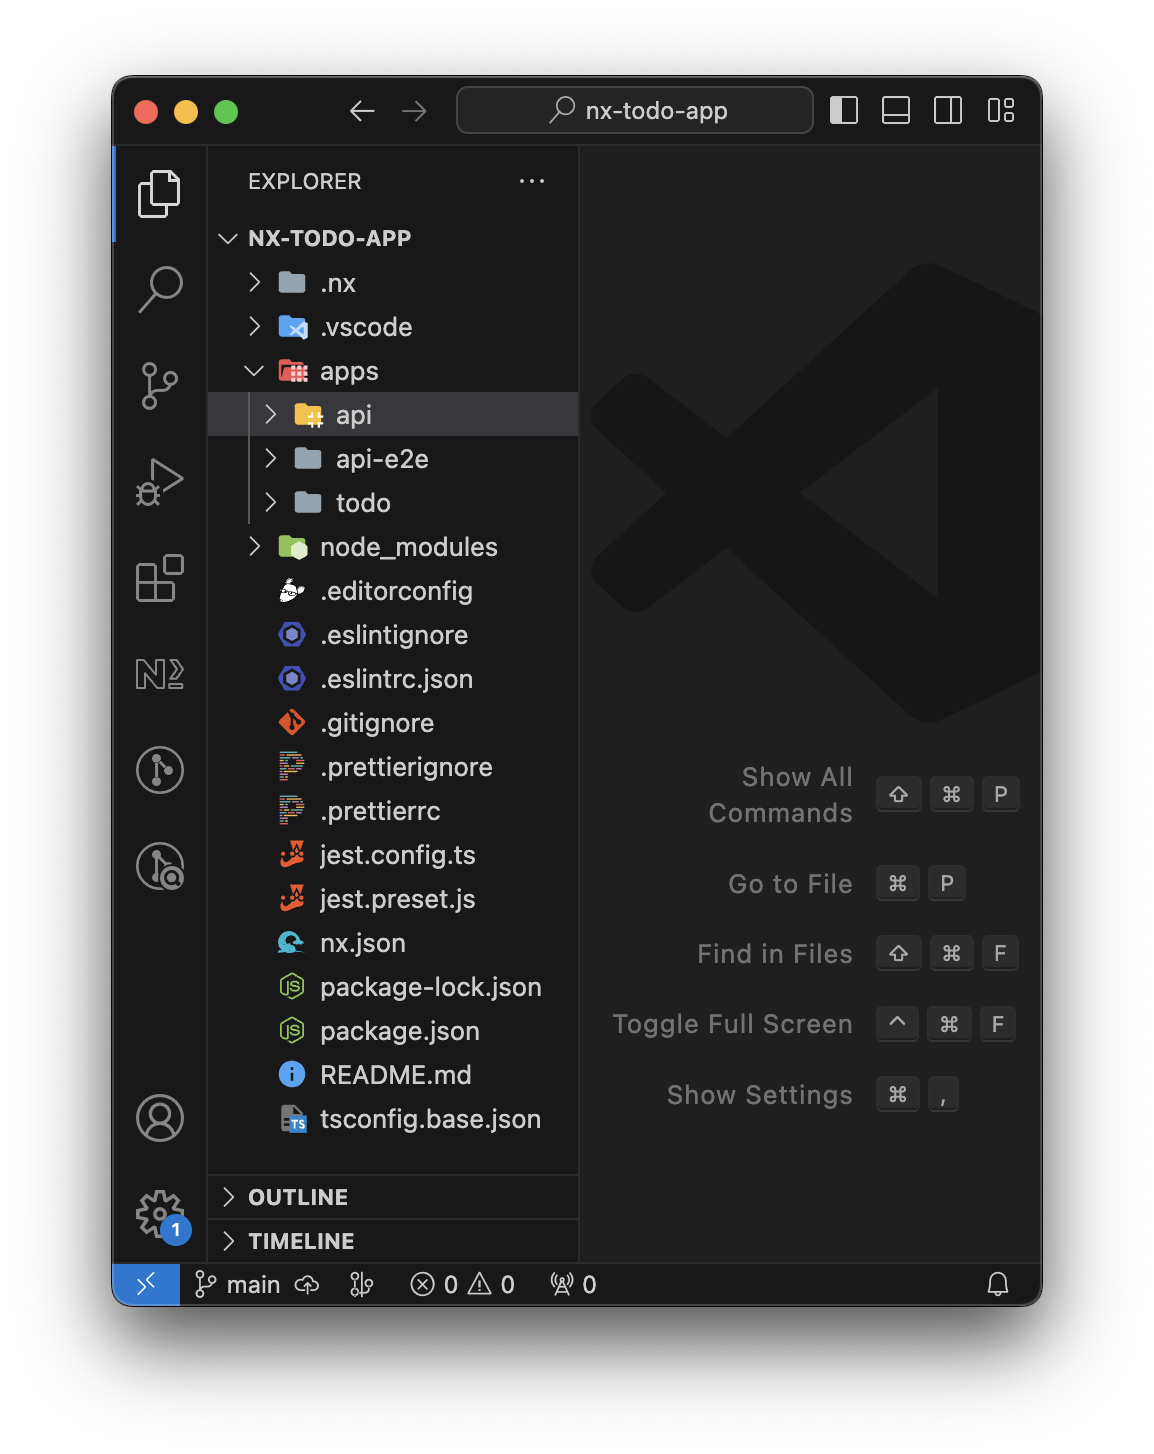
After the frontend and api apps have been installed, the folder structure should look something like below
Step 2 - Create APIs in NestJS App
We will be creating a in-memory database to store our ToDos. So we are not using any external databases, but the code can be modified to support your databases as well. We will also use OpenAPI to display the API documentation.
-
Install the Swagger dependency through
npm install --save @nestjs/swagger -
After your dependencies have been installed, add the Swagger configuration to your apps/api/src/main.ts file. Below is the main.ts file after adding configuration.
import { Logger } from "@nestjs/common";
import { NestFactory } from "@nestjs/core";
import { DocumentBuilder, SwaggerModule } from "@nestjs/swagger";
import { AppModule } from "./app/app.module";

async function bootstrap() {
  const app = await NestFactory.create(AppModule);
  const globalPrefix = "api";
  app.setGlobalPrefix(globalPrefix);
  // Swagger configuration
  const config = new DocumentBuilder()
    .setTitle("Todo API")
    .setDescription("API documentation for Todo application")
    .setVersion("1.0")
    .build();
  const document = SwaggerModule.createDocument(app, config);
  SwaggerModule.setup("api", app, document);
  const port = process.env.PORT || 3000;
  await app.listen(port);
  Logger.log(
    `🚀 Application is running on: http://localhost:${port}/${globalPrefix}`
  );
}

bootstrap();
-
You should now have OpenAPI empty documentation ready. To view the Swagger docs in your browser, start the API server using
nx serve apiand browse to http://localhost:3000/api and you should see the below image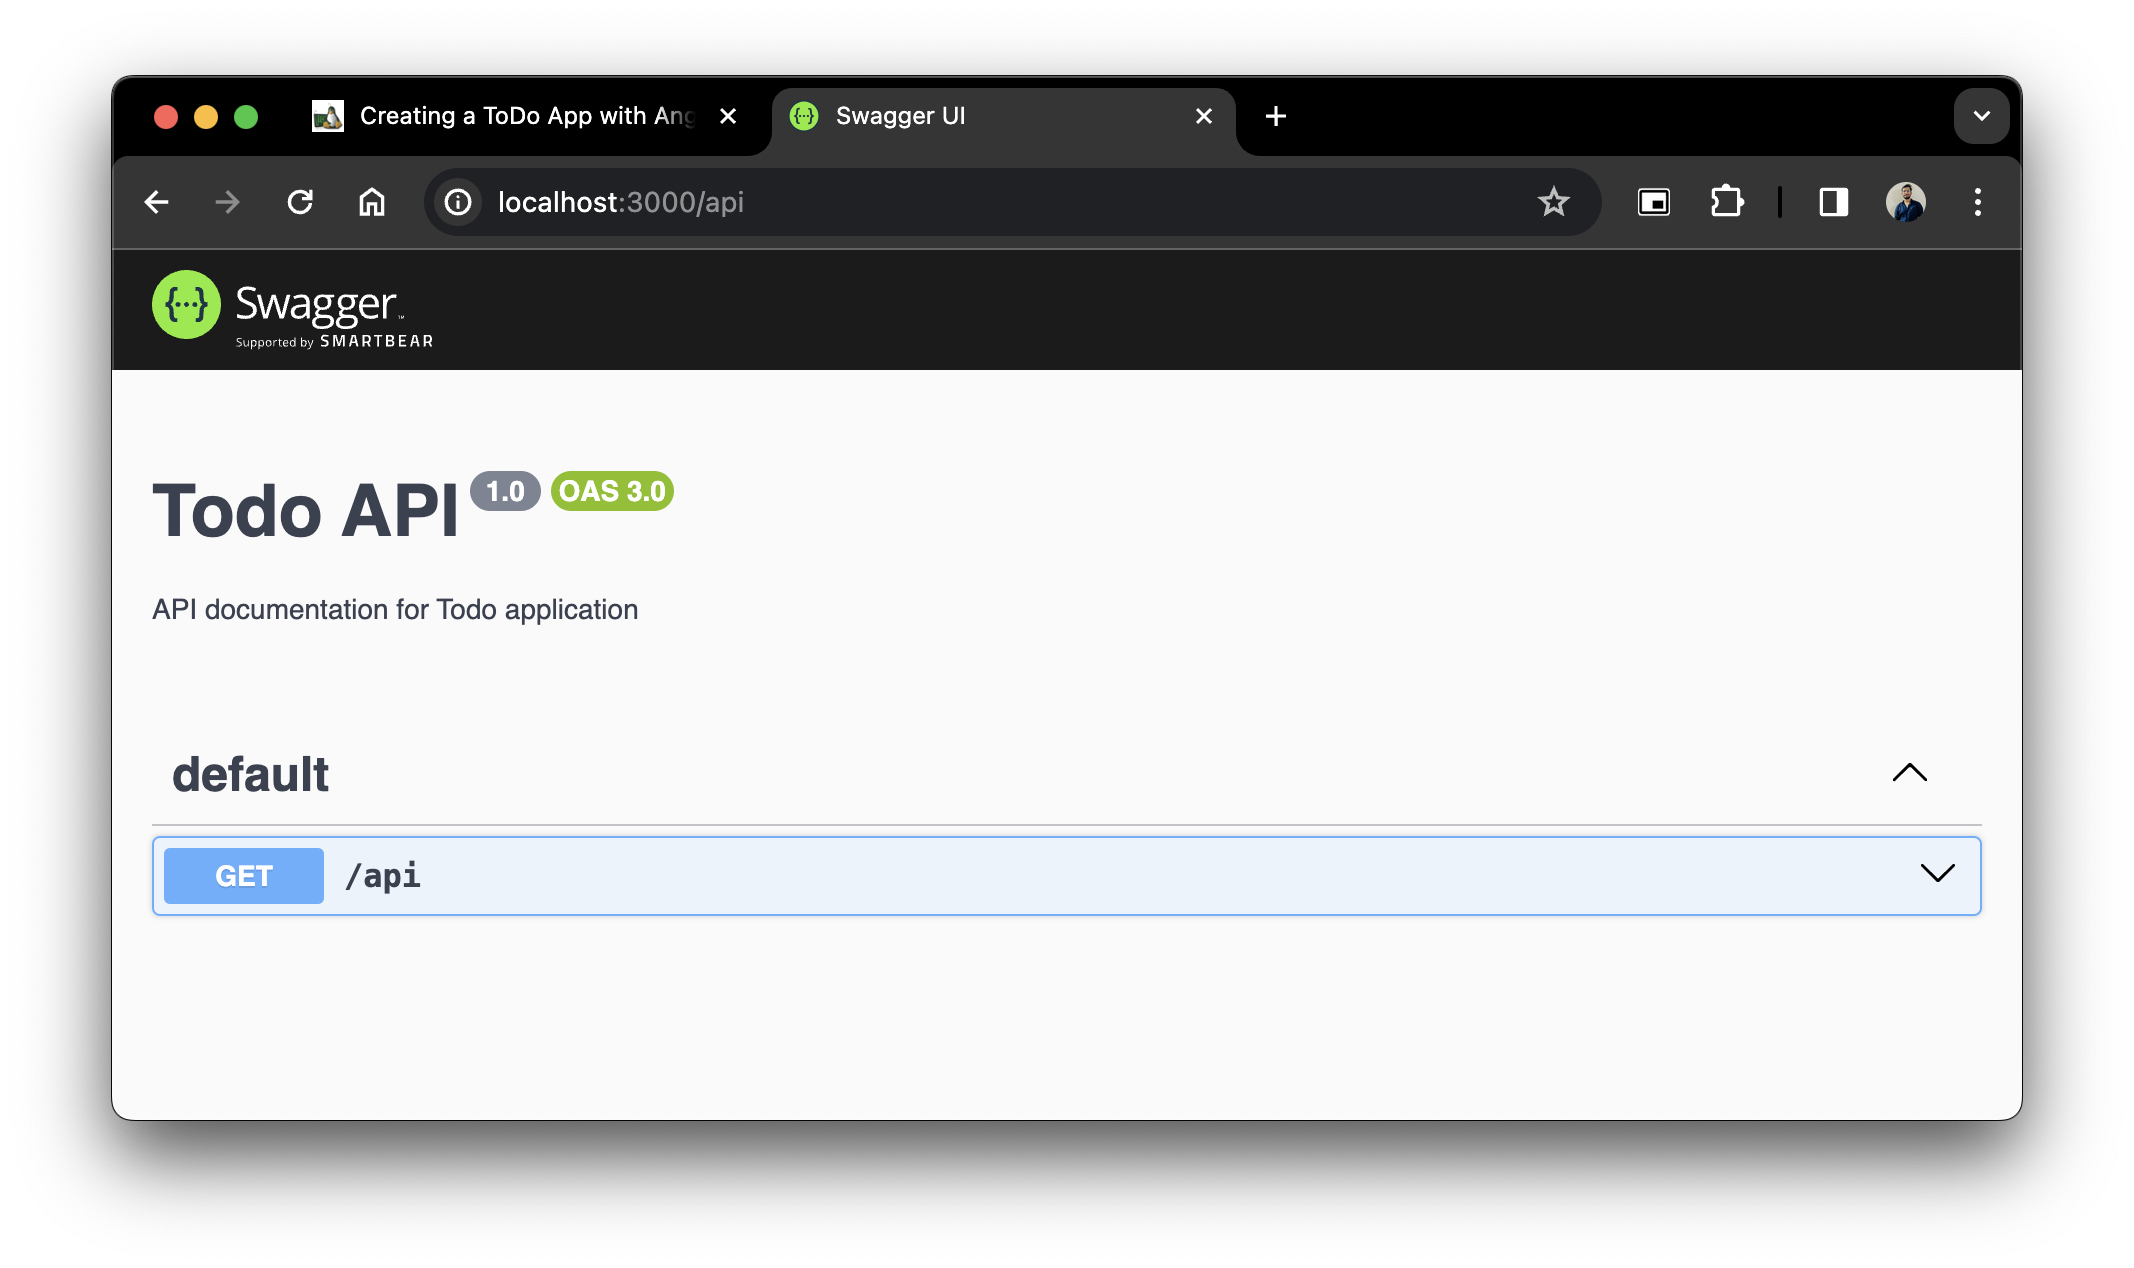
-
Let’s write the API services and controllers. Before that, we will add a new library which will hold our models and interfaces for our ToDo object. Generate a new library in Nx workspace using the command
nx g @nx/js:library --name=types --bundler=none --directory=libs/types --projectNameAndRootFormat=as-providedor use the Nx Console to generate a@nx/jslibrary. -
In the newly generated lib, go to
libs/types/src/lib/types.tsfile and add the DTOs and model for our ToDo object.
import { ApiProperty } from "@nestjs/swagger";

export class ToDoDto {
  @ApiProperty({ description: "Task" })
  task!: string;
}

export interface ToDo extends ToDoDto {
  id: string;
  done: boolean;
}
The ToDoDto is used to transfer via REST, and ToDo interface stores additional properties indicating id and status.
- Once your types lib is ready, we can move to writing our service. For sake of simplicity in this tutorial, I will not be using any Database and will be creating the Tasks in-memory.
File: apps/api/src/app/app.service.ts
import { Injectable, NotFoundException } from "@nestjs/common";
import { ToDo, ToDoDto } from "@nx-todo-app/types";

@Injectable()
export class AppService {
  todos: ToDo[] = [];

  getAllToDos() {
    return this.todos;
  }

  addToDo(todoDto: ToDoDto) {
    const todo: ToDo = { id: String(Date.now()), done: false, ...todoDto };
    this.todos.push(todo);
    return { message: "ToDo successfully added" };
  }

  getActiveToDos() {
    return this.todos.filter((todo) => !todo.done);
  }

  getCompletedToDos() {
    return this.todos.filter((todo) => todo.done);
  }

  updateToDo(id: string, done: boolean) {
    const todo = this.todos.find((todo) => todo.id === id);
    if (todo) {
      todo.done = done ?? todo.done;
      return { message: `ToDo with ID ${id} updated successfully` };
    } else {
      throw new NotFoundException(`ToDo with ID ${id} not found`);
    }
  }

  deleteToDo(id: string) {
    const todoIndex = this.todos.findIndex((todo) => todo.id === id);
    if (todoIndex === -1) {
      throw new NotFoundException(`ToDo with ID ${id} not found`);
    }
    this.todos.splice(todoIndex, 1);
    return { message: `ToDo with ID ${id} deleted successfully` };
  }
}
The todos array holds our tasks in memory. Standard CRUD(Create, Read, Update and Delete) functions have been written which are self explanatory.
(Please put in comments if something is unclear).
- The next step is to write the API Controllers to access this service. We will write the following REST Functions (GET, PUT, POST, DELETE).
File: apps/api/src/app/app.controller.ts
@ApiTags("tasks")
@Controller("/v1/tasks")
export class AppController {
  constructor(private readonly appService: AppService) {}

  @Get()
  @ApiOperation({ summary: "Get all ToDos" })
  @ApiResponse({
    status: 200,
    description: "Returns an array of ToDos",
    isArray: true,
  })
  getAllToDos() {
    return this.appService.getAllToDos();
  }

  @Post()
  @ApiOperation({ summary: "Add a new ToDo" })
  @ApiBody({ type: ToDoDto })
  @ApiResponse({ status: 201, description: "ToDo successfully added" })
  addToDo(@Body() todo: ToDoDto) {
    return this.appService.addToDo(todo);
  }

  @Put(":id/done")
  @ApiOperation({ summary: "Update the status of a ToDo" })
  @ApiParam({ name: "id", description: "ToDo ID" })
  @ApiBody({ schema: { properties: { done: { type: "boolean" } } } })
  @ApiResponse({ status: 200, description: "ToDo updated successfully" })
  updateStatus(@Param("id") id: string, @Body("done") done: boolean) {
    return this.appService.updateToDo(id, done);
  }

  @Delete(":id")
  @ApiOperation({ summary: "Delete a ToDo" })
  @ApiParam({ name: "id", description: "ToDo ID" })
  @ApiResponse({ status: 200, description: "ToDo deleted successfully" })
  deleteToDo(@Param("id") id: string) {
    return this.appService.deleteToDo(id);
  }
}
- Run
nx serve apiand browse to http://localhost:3000/api, and you should have all the APIs ready. Go and Try it yourself using cURL or Postman. The OpenAPI Schema should look like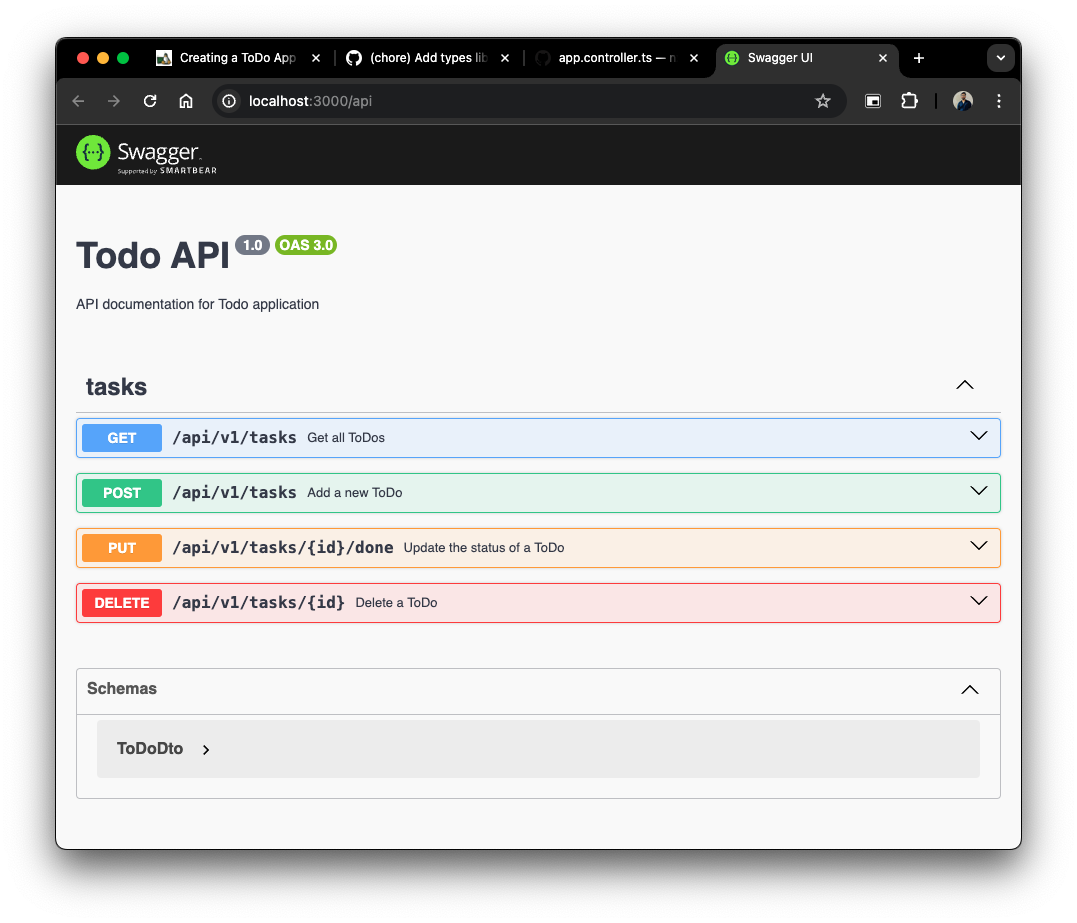
Step 3 - Generate OpenAPI Services for Angular
You might ask, why we cannot write our own HttpService in Angular. Sure, we can! But why to do it manually when we have an awesome OpenAPI Generator CLI tool available.
-
Install the OpenAPI Generator by -
npm install @openapitools/openapi-generator-cli -g. This will globally install the openapi-generator-cli in your machine. -
We will create a new library to hold our OpenAPI generated services. Create a new lib using
nx g @nx/js:library --name=openapi-generated --bundler=none --directory=libs/openapi-generated --projectNameAndRootFormat=as-providedand delete the 2 files openapi_generated.ts and openapi_generated.spec.ts -
Next, we will run the command to populate our Typescript client service -
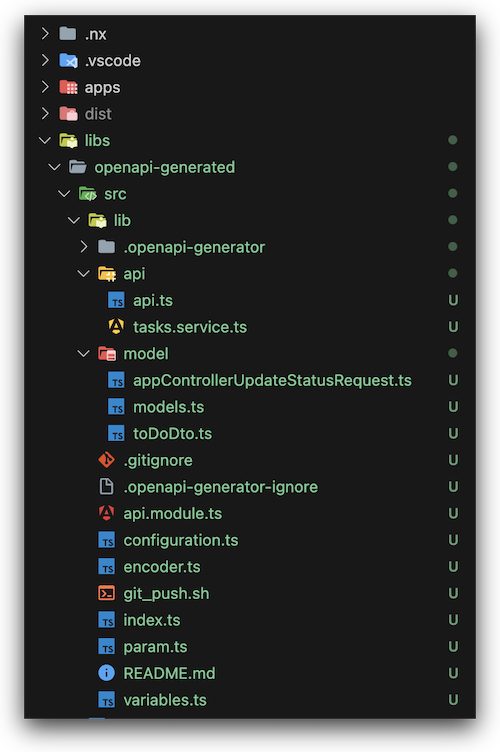
npx @openapitools/openapi-generator-cli generate -i http://localhost:3000/api-json --generator-name typescript-angular -o libs/openapi-generated/src/lib --additional-properties=useSingleRequestParameter=true. This wil generate a bunch of files including model and api. You can browse to see the ToDoDto model among others and the todo service file generated.Make sure your NestJS server is up and running, and then execute this command. It picks up the OpenApi Spec from http://localhost:3000/api-json.
-
You should have the following openapi-generated library as shown in below picture.
-
One final step, update the
libs/openapi-generated/src/index.tsfile to include our APIs.
export * from "./lib/api/api"; //This will allow the APIs to be exposed.
We have completed coding our backend, and will move now to code our UI in Angular. 
Step 4 - Add Angular Material and Tailwind CSS Libraries
-
We will be using Angular Material and Tailwind for our frontend app.
-
Install Angular Material in your project using the command
npx nx g @angular/material:ng-add --project=todoand use the below image as reference to choose your options.
- Install Tailwind CSS using
npx nx g @nx/angular:setup-tailwind todo.
Step 5 - Add Store for ToDo App (Actions, Reducers, and Effects)
For those unaware of NgRx Store, refer here - NgRx Store Guide
In our app, we will be using the Global Store state management.
-
Install the necessary store dependencies using
nx g ngrx-root-store todo --addDevTools=true. This will add the Store and Effects module in the app.config.ts file of your apps/todo/src/app folder. -
Create a new folder under apps/todo/src/app/ named store/todo where we will write our actions, reducers and effects.
- Create 3 files named as todo.actions.ts, todo.effects.ts, and todo.reducers.ts in the same folder.
Actions
- Let’s begin by writing our first action to load all the tasks.
// Load Tasks
export const loadTasks = createAction("[Todo] Load Tasks");
export const loadTasksSuccess = createAction(
  "[Todo] Load Tasks Success",
  props<{ tasks: ToDo[] }>()
);
export const loadTasksFailure = createAction(
  "[Todo] Load Tasks Failure",
  props<{ error: unknown }>()
);
- Similarly, we will write the actions for all other CRUD operations
// Add Task
export const addTask = createAction("[Todo] Add Task", props<{ task: ToDo }>());
export const addTaskSuccess = createAction(
  "[Todo] Add Task Success",
  props<{ task: ToDo }>()
);
export const addTaskFailure = createAction(
  "[Todo] Add Task Failure",
  props<{ error: unknown }>()
);

// Update Task Status
export const updateTaskStatus = createAction(
  "[Todo] Update Task Status",
  props<{ id: string; done: boolean }>()
);
export const updateTaskStatusSuccess = createAction(
  "[Todo] Update Task Status Success",
  props<{ id: string; done: boolean }>()
);
export const updateTaskStatusFailure = createAction(
  "[Todo] Update Task Status Failure",
  props<{ error: unknown }>()
);

// Delete Task
export const deleteTask = createAction(
  "[Todo] Delete Task",
  props<{ id: string }>()
);
export const deleteTaskSuccess = createAction(
  "[Todo] Delete Task Success",
  props<{ id: string }>()
);
export const deleteTaskFailure = createAction(
  "[Todo] Delete Task Failure",
  props<{ error: unknown }>()
);
Github Code - todo.actions.ts
Reducers
Reducers are used to change the state based on the action type. We will write the reducers for all the actions listed above. We first start with the state required in our app, which will be used to store the tasks data.
- In the todo.reducer.ts file, create the AppState and TodoState.
export interface AppState {
  tasks: TodoState;
}
export interface TodoState {
  tasks: ToDo[]; //List of tasks retrieved from API
  loading: boolean; //To show loader on screen
  error: unknown; //Sets to error object for any API failures
}

const initialState: TodoState = {
  tasks: [],
  loading: false,
  error: null,
};
- Next, we write the todoReducer using NgRx’s createReducer function which takes the initialState and multiple actions as parameters.
export const todoReducer = createReducer(
  initialState,

  on(TodoActions.loadTasks, (state) => ({
    ...state,
    loading: true,
    error: null,
  })),

  on(TodoActions.loadTasksSuccess, (state, { tasks }) => ({
    ...state,
    tasks: [...tasks],
    loading: false,
  })),

  on(TodoActions.loadTasksFailure, (state, { error }) => ({
    ...state,
    loading: false,
    error,
  })),

  on(TodoActions.addTaskSuccess, (state, { task }) => ({
    ...state,
    tasks: [...state.tasks, task],
  })),

  on(TodoActions.updateTaskStatusSuccess, (state, { id, done }) => ({
    ...state,
    tasks: state.tasks.map((task) =>
      task.id === id ? { ...task, done } : task
    ),
  })),

  on(TodoActions.deleteTaskSuccess, (state, { id }) => ({
    ...state,
    tasks: state.tasks.filter((task) => task.id !== id),
  }))
);
Github Code - todo.reducer.ts
Effects
Effects interact with external services(in our case, the backend API) based on the Actions and update the state. We will need 4 effects to support all CRUD operations.
- Here is the loadTasks effect using NgRx’s createEffect function. We use the 3 loadTasks actions - loadTasks, loadTasksSuccess and loadTasksFailure to call the effect.
loadTasks$ = createEffect(() =>
  this.actions$.pipe(
    ofType(TodoActions.loadTasks),
    mergeMap(() =>
      this.todoService.appControllerGetAllToDos().pipe(
        map((tasks) => TodoActions.loadTasksSuccess({ tasks })),
        catchError((error) => of(TodoActions.loadTasksFailure({ error })))
      )
    )
  )
);
In this code block, we pipe through the actions from NgRx (full code below), and call the todoService method to load tasks. For a successful response, it is mapped and TodoActions.loadTasksSuccess is called which in turn will call the reducer to update the state. Later in the Angular component, we will subscribe to the state changes and update our component. For any errors TodoActions.loadTasksFailure is called with the error sent as prop.
- Here is the complete file with other effects for Add Task, Update Task, and Delete Task.
import { Injectable } from "@angular/core";
import { Actions, createEffect, ofType } from "@ngrx/effects";
import { mergeMap, map, catchError, of } from "rxjs";
import * as TodoActions from "./todo.actions";
import { TasksService } from "@nx-todo-app/openapi-generated";

@Injectable()
export class TodoEffects {
  constructor(private actions$: Actions, private todoService: TasksService) {}

  loadTasks$ = createEffect(() =>
    this.actions$.pipe(
      ofType(TodoActions.loadTasks),
      mergeMap(() =>
        this.todoService.appControllerGetAllToDos().pipe(
          map((tasks) => TodoActions.loadTasksSuccess({ tasks })),
          catchError((error) => of(TodoActions.loadTasksFailure({ error })))
        )
      )
    )
  );

  addTask$ = createEffect(() =>
    this.actions$.pipe(
      ofType(TodoActions.addTask),
      mergeMap(({ task }) =>
        this.todoService.appControllerAddToDo(task).pipe(
          map((addedTask) => TodoActions.addTaskSuccess({ task: addedTask })),
          catchError((error) => of(TodoActions.addTaskFailure({ error })))
        )
      )
    )
  );

  updateTaskStatus$ = createEffect(() =>
    this.actions$.pipe(
      ofType(TodoActions.updateTaskStatus),
      mergeMap(({ id, done }) =>
        this.todoService.appControllerUpdateStatus({ done }, id).pipe(
          map(() => TodoActions.updateTaskStatusSuccess({ id, done })),
          catchError((error) =>
            of(TodoActions.updateTaskStatusFailure({ error }))
          )
        )
      )
    )
  );

  deleteTask$ = createEffect(() =>
    this.actions$.pipe(
      ofType(TodoActions.deleteTask),
      mergeMap(({ id }) =>
        this.todoService.appControllerDeleteToDo(id).pipe(
          map(() => TodoActions.deleteTaskSuccess({ id })),
          catchError((error) => of(TodoActions.deleteTaskFailure({ error })))
        )
      )
    )
  );
}
As the final step to setup your store, we need to register the effects and store in our app.config.ts.
- In the app.config.ts file, update the providers array to change the provideEffects() and provideStore() to
provideEffects([TodoEffects]),
provideStore({ tasks: todoReducer }),
Step 6 - Write the ToDo Component
We will have a look at the UI and see that we have 2 components to build.
- One is a list component which has the input bar and the todos, which will be reused in the 3 tabs(All, Active, Completed).
- The top one is the app.component which has the title and 3 tabs.
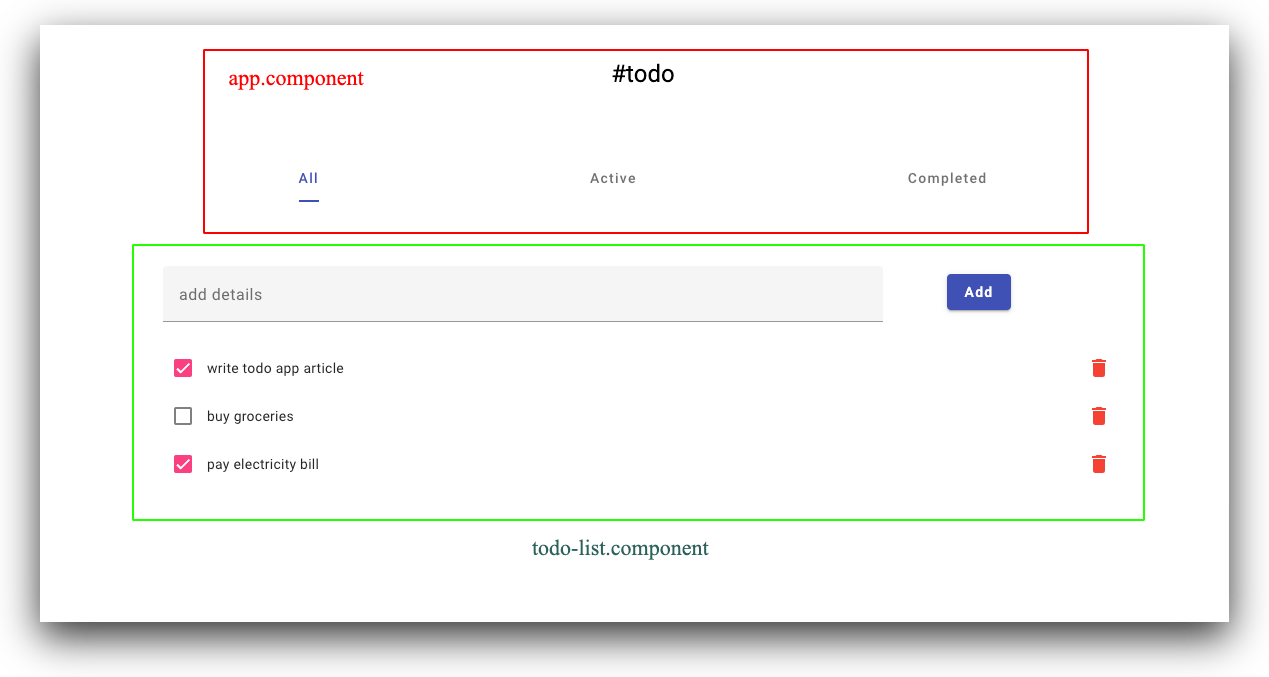
todo component
-
Generate a new component using
nx g @nx/angular:component --name=todo-list --directory=apps/todo/src/app/components/todo-list --changeDetection=OnPush --nameAndDirectoryFormat=as-provided --skipTests=true -
We will be using Angular Material’s components to build our component. Add the below template file to todo-list.component.html
<form class="flex mt-16" (submit)="addTask(taskInput.value)">
  <mat-form-field class="w-9/12">
    <mat-label>add details</mat-label>
    <input matInput #taskInput />
  </mat-form-field>
  <button type="submit" mat-raised-button color="primary" class="mt-2 ml-16">
    Add
  </button>
</form>

<ul>
  <li *ngFor="let item of tasks" class="flex items-center justify-between">
    <mat-checkbox
      [checked]="item.done"
      (change)="updateTaskStatus(item, $event.checked)"
    >

    </mat-checkbox>
    <button mat-icon-button color="warn" (click)="deleteTask(item.id)">
      <mat-icon>delete</mat-icon>
    </button>
  </li>
</ul>
- Import the necessary modules in the component file, and inject store into component. We will dispatch the necessary store actions on event handlers present in the template file. Below is the complete code for todo-list.component.ts
@Component({
  selector: "nx-todo-app-todo-list",
  standalone: true,
  imports: [
    CommonModule,
    MatCheckboxModule,
    MatInputModule,
    MatButtonModule,
    MatIconModule,
  ],
  templateUrl: "./todo-list.component.html",
  changeDetection: ChangeDetectionStrategy.OnPush,
})
export class TodoListComponent {
  @ViewChild("taskInput")
  taskInput!: ElementRef<HTMLInputElement>;
  @Input()
  tasks!: ToDo[] | null;

  constructor(private store: Store<AppState>) {}

  addTask(taskInput: string): void {
    if (taskInput.trim() === "") {
      return;
    }
    //Create new object for a task
    const task: ToDo = {
      id: Date.now().toString(),
      task: taskInput,
      done: false,
    };
    this.store.dispatch(addTask({ task }));
    this.taskInput.nativeElement.value = ""; //Reset input form
  }

  updateTaskStatus(task: ToDo, event: boolean): void {
    this.store.dispatch(updateTaskStatus({ id: task.id, done: event }));
  }

  deleteTask(id: string): void {
    this.store.dispatch(deleteTask({ id }));
  }
}
app component
- The app.component.ts contains a simple template with the title and tabs. We use Angular Material Tabs for 3 tabs - All (All Tasks), Active (Active Tasks), and Completed (Completed Tasks).
<head class="flex justify-center my-12">
  <title>ToDo App</title>
  <h1>#todo</h1>
</head>

<body class="container mx-auto w-1/2">
  <mat-tab-group
    fitInkBarToContent
    mat-stretch-tabs
    class="border-b-1 border-black"
  >
    <mat-tab label="All">
      <nx-todo-app-todo-list
        [tasks]="allTasks$ | async"
      ></nx-todo-app-todo-list>
    </mat-tab>
    <mat-tab label="Active">
      <nx-todo-app-todo-list
        [tasks]="activeTasks$ | async"
      ></nx-todo-app-todo-list>
    </mat-tab>
    <mat-tab label="Completed">
      <nx-todo-app-todo-list
        [tasks]="completedTasks$ | async"
      ></nx-todo-app-todo-list>
    </mat-tab>
  </mat-tab-group>
</body>

<router-outlet></router-outlet>
We pass the tasks as input to the nx-todo-app-todo-list or simply todo-list.component.ts depending on tab (all, active and completed). The async keyword subscribes to the observable (allTasks$, activeTasks$, completedTasks$) and sends the list to child component. More details in the component implementation.
- The component code is listed below, with explanation after that
@Component({
  standalone: true,
  imports: [
    CommonModule,
    HttpClientModule,
    RouterModule,
    MatTabsModule,
    TodoListComponent,
  ],
  selector: "nx-todo-app-root",
  templateUrl: "./app.component.html",
})
export class AppComponent {
  title = "todo";
  allTasks$: Observable<ToDo[]>;
  activeTasks$: Observable<ToDo[]>;
  completedTasks$: Observable<ToDo[]>;

  constructor(private store: Store<AppState>) {
    this.store.dispatch(loadTasks());
    this.allTasks$ = this.store.select((state) => state.tasks.tasks);
    this.activeTasks$ = this.allTasks$.pipe(
      // Filter active tasks
      map((tasks) => tasks.filter((task) => !task.done))
    );
    this.completedTasks$ = this.allTasks$.pipe(
      // Filter completed tasks
      map((tasks) => tasks.filter((task) => task.done))
    );
  }
}
- title shows the app’s name
- We inject the store in our app’s constructor and dispatch(call) the loadTasks action so the relevant effect is triggered, and API call is triggered.
Make sure the backend is running before running your Angular app. (Hint: Execute
nx serve apito get APIs up & running). -
We create 3 observables to store the tasks -
- allTasks$ - Gets all tasks
- activeTasks$ - Filters tasks having done as false
- completedTasks$ - Filters tasks with done as true
- These observables are subscribed in the template using async and relevant data is displayed in all the 3 tabs.
This marks the end of our application. You should have the complete application running now. Use nx serve todo to run the UI application. Try playing by adding/updating or deleting tasks, and see the network call happening in your browser with data.
Code
Get complete code at msindev/nx-todo-app
Feel free to add suggestions/questions in the comment box below if you are stuck anywhere in the tutorial.